A lawn sweeper is a pretty economical solution for fall cleanup. They generally work pretty well, and are a simple design without much to go wrong. They dont work the best on wet leaves, or if leaves are sitting matted down in a low spot, but they are a huge back and time saver.
Me and my neighbor split an Ohio Steel 22cuft lawn sweeper 3 years ago. So its been doing double duty. So far I have had to do a couple fixes, but we are pretty hard on it to. (I back it into the leaf pile to tidy it up and push it up which is real hard on it). (Update: Its been 10 years now and I am still using it, see embedded video at end of article for 10yr review).
Anyway..here are a couple mods i have had to make to make it more efficient and usable.
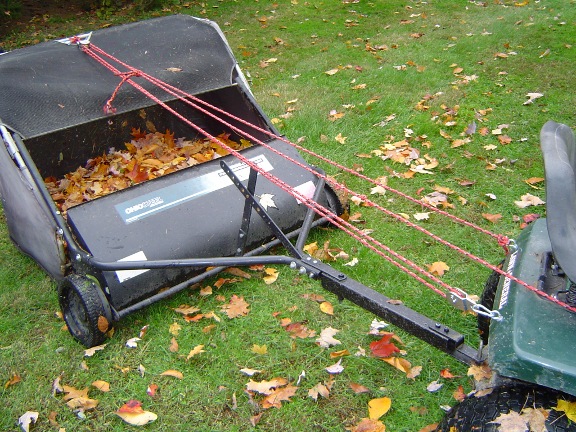
Extend the tow arm about 2 ft. - as bought, the sweeper did not have a long enough wheel base. What this meant was that it was impossible to back up for any distance what so ever. It was simply to touchy and would jackknief on a dime. Extending the tow arm a couple of feet makes it infinatly more usable when backing up (even now its still touchy but managable). As manufactured, it had 4 plates that let you select 4 height preferences. by flipping these plates around I was able to use them to both bolt the 2x2 tubing onto the town arm, as well as create a single connector to the tractor on the other end. No welding required, just drill 3 holes and find another bolt. (see update at bottom for more)
Studded tires - the hard plastic wheels have almost no tread on them. if a pile of leaves gets under the tire or you are on wet grass they can just slide along and the sweeper which is driven by the wheels will do nothing. For this, I loaded one of the tires with hex head sheet metal screws screwed right into the hard plastic of the tire. A couple have come out, but after 4yrs almost all are still in. The studs do seem to give a moderate traction improvement. It was worth the effort although the extra traction may be tough on the cheap wheel turning corners (Update:10 yr review found this hub cracked, plain wheel ok. probable cause?)
Pulley system to empty basket - as shown in the picture below, i rigged up a pulley system that gives me a 4:1 advantage (i think?) and lets me empty the basket while still sitting on the tractor. A simple direct rope pull was not enough with a full load, why kill yourself especially when you are sitting down and pulling something from behind you. Also when you have to do it over and over again.
Here is what it looks like:
Stuff i still want to figure out:
way to lock the basket to the front frame so it cant skip on high spots and dump leaves as you are moving. (thinking of a pin latch with a string release so I can trip it from seat) A series of magnets may be a good choice too or a simple return spring. (solved see drop hitch at bottom)
i want to figure out a way to make it more effective on wet leaves or low spots. maybe a very delicate spring rake just before the brush to uproot matted down leaves. - Solved: run with the blades spinning to mulch up the leaves and suck them up off the low spots. this also means WAY less trips to the dump pile
Repairs i have had to do after 3yrs (double use = about 1 acre heavy leaf cleanup a year)
metal tubing for basket broke at a bend. (from using it to back into the pile) solution - welded a couple nails over the broken spot to reinforce.
lost several pins in use - replaced with bend over nails or new pins whatever was on hand.
rivits holding bottom of basket to frame have broken off so the basket bottom sags. I will either add new rivits or lash it to the bar.
misc cloth rips - there are a handfull of punctures and tears..the material is surprisingly tear resistant..i havent had to fix any of them yet. we also leave it sit out all winter, mostly under a pine tree but it does get some direct sunlight too. holding up very well!
hard plastic bottom of basket broke out in a corner. I rivited in another layer of plastic sheet inside to cover the hole and duck taped the edges to keep it flush and sealed. So far so good.
In summary..i love this thing. since we split it 2 ways and it has given us both an unbelievable amount of work savings. I would not go without one for this price.
Update 10.18.2011
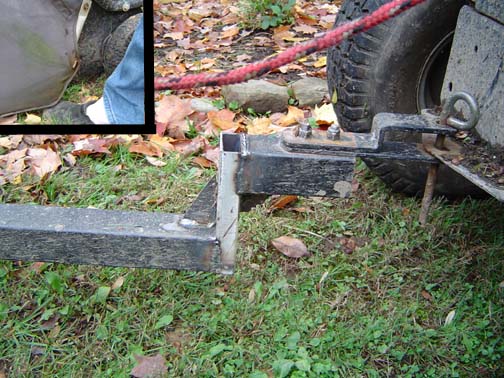
So another year another couple refinements. The problem with the basket skipping along the ground at times and dumping leaves when i hit bumps has been solved. I modified the hitch arm to include a drop neck. This rotates the front edge of the bag up away from the ground. For my lawn, it seems that if I can fit a toe under each front edge of the bag, thats enough clearance (top left corner)
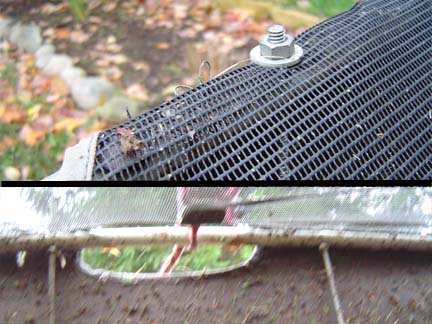
Also, the bag has two rods inside of it that push apart the lower and upper frames. These were always coming out which leaves the bag droopy and harder to empty. This has been solved by drilling the holes through the upper mount and running all thread down through. A nut on the lower side of the top rail keeps the rod pushed down tight against the lower rail. and a nut on the top keeps teh whole thing secured and locked in place (especially if the lower end of the rod pops out of the lower rail. I have already lost several of these rods from falling out with the original style where it was just fit in there with nothing to secure it)
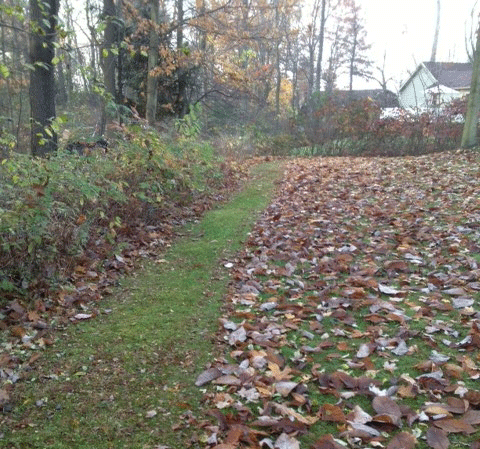
Now I can keep the brush height adjustment down low so the brush is nice and tight to the grass with no basket skipping. Today I was picking up a heavy mat of wet leaves in one pass and leaving a clean strip of grass. Perfect.
Here is a pict of a single pass in high gear, blades on, through damp leaves
In addition to the repairs in the video I also decided to epoxy the white bushings into the wheels hub. The hubs appears to have bell mouthed the wheel hubs. There was also play in the bushing to axle shaft but I didnt have an easy way to handle that without ordering new bushings. Maybe I could have split the bushing and adding tin foil or shim stock in hub to compress it, but it didnt feel worth the risk, Anyway i can order all new tires and bushings for like $80 so who cares. I would probably sell the whole unit at this point and just buy a new one before i did that anyway.
Comments: (5)
On 02.21.17 - 12:32pm Rob C. wrote:
Have you done any additional modifications? I was thinking about trying to make a bigger basket, somehow
On 02.21.17 - 11:51pm Dave wrote:
nope no other mods its been working perfect for years, thought of bigger basket but it would fail on wet leaves. If I upgrade it will be to a leaf vac/ bagger spitting them into a trailer. One other thing I eventually realized is that having the blades spinning while using leaf sweeper is good. It sucks up the leaves stuck in depressions and mulches all leaves so you get more in the basket per dump
On 09.13.20 - 8:16pm Ross wrote:
I have same slipping problem with my Ohio Steel sweeper and was thinking of studding the tires. Other idea was to make new wheels like the 1930s Ford tractors that were all metal with grousers. However, this would not be a quick fix. Was the cracked hub fatal or how did you fix? Another idea I had was to make wheel weights. Third idea was chains or some clamp on kind of grousers.
On 10.23.21 - 6:40pm Richard wrote:
I bought small bicycle tires for the rubber tread. Cut off the sidewalls and stretched them onto the plastic wheels. I used drywall screws between treads to affix. This works better than the plastic.
On 09.30.24 - 12:16pm Pj wrote:
I wish they gave us some stiffer brush options, I would like to use it to be able to pick up acorns. It did OK for the first few years but this year it’s just not working so well.