Shed PlansAuthor: Dave Date: 10.08.14 - 11:28pm This is some notes on building a shed. It appears that several websites have spammed the hell out of the Internet with "free shed plans". While really offering nothing. I'm not going to give full plans just highlights for a 8x8 Gambrell style shed which should be enough for most people. I chose the Gambrell design because it looks pretty good and is very efficient on materials also the roof height is not too high and I never had to get up on it off the ladder. The downside is that the roof trusses are a little time-consuming and the extra angles and cuts may be difficult for inexperienced builders. 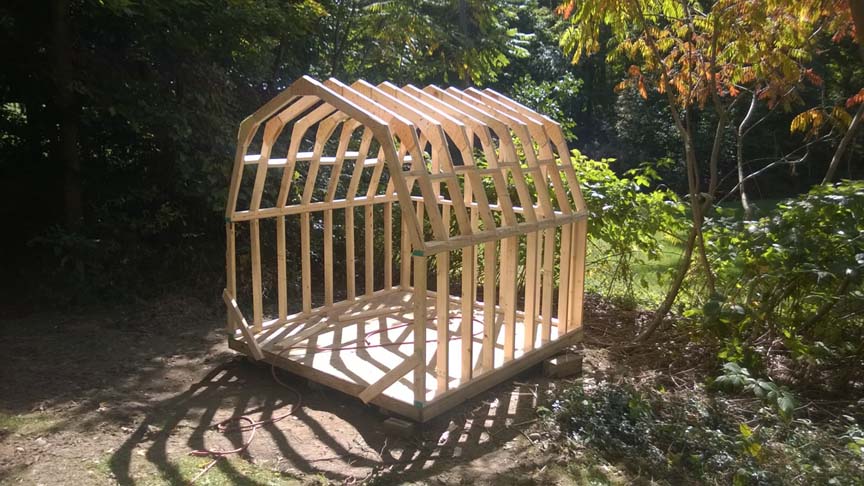
First let me say I build things over kill. It doesn't cost that much more but leads to a substantially stronger structure. Also this is only my second shed ever so I'm sure some things are not perfect but this is what I did and it worked for me. First a raw material list. Note that I put all studs 1 foot on center, and the floor joists are 8 inches on center because I used to 2x4s for their low height profile.
So for the highlights, building the base.. I put the two out side skids 6 feet outside edge, with the third down the center. I cut 45° chamfers on each end with a chainsaw. These two details should allow it to be pulled up onto a flatbed easily if I ever decide to move or sell it. I set them vertically to use the 6in height to get more clearance from the ground. To cut the floor joists all except two of the pressure-treated two by fours were cut to remove two thicknesses of 2 2 x 4. This will give a final dimension of 8ft x 8ft. Two of the joists are also doubled up, to give enough meat for heavy lag bolts to go down into the skids. Each skid gets two heavy lag bolts, and three 1/4 inch lag bolts 6 inches long. I figure this is strong enough to hold the shed on when winching the skids I forgot to toenail the joists to the skids so had to do it this way but this is stronger I am sure. Make really sure that your base platform is square before nailing on the decking. You do this I'm measuring the diagonal dimensions corner to corner. To level the skids I bedded them down into the dirt however this was the hard way to do it and I do not recommend it, better to raise them up with blocks and shims at front and back points, rather than having an 8 foot run that has to be flat. The studs in the two side walls were made to be 42 inches long. This is so that the plywood siding can be cut in 4 foot lengths and have it cover the upper and lower two by fours plus overlap 3 inches of the base for additional nailing and appearance. To ensure all of the pieces are cut to the same length I used a radial arm saw with a stop. The miter box with a stop would be just as good, but using a work stoppage is highly recommended so that all lengths end up exactly the same. This tip applies also to the floor joists, and even more critically the roof truss sections. The Gambrell trusses were built using an online calculator. I went with zero overhang 8 foot span. The length on the long ends worked out to be 36 and three quarters of an inch, with a 22 1/2° angle. Four Identical sections per truss. Some truss designs were shown with different lengths and different angles, that was a can of worms I was not interested in opening. 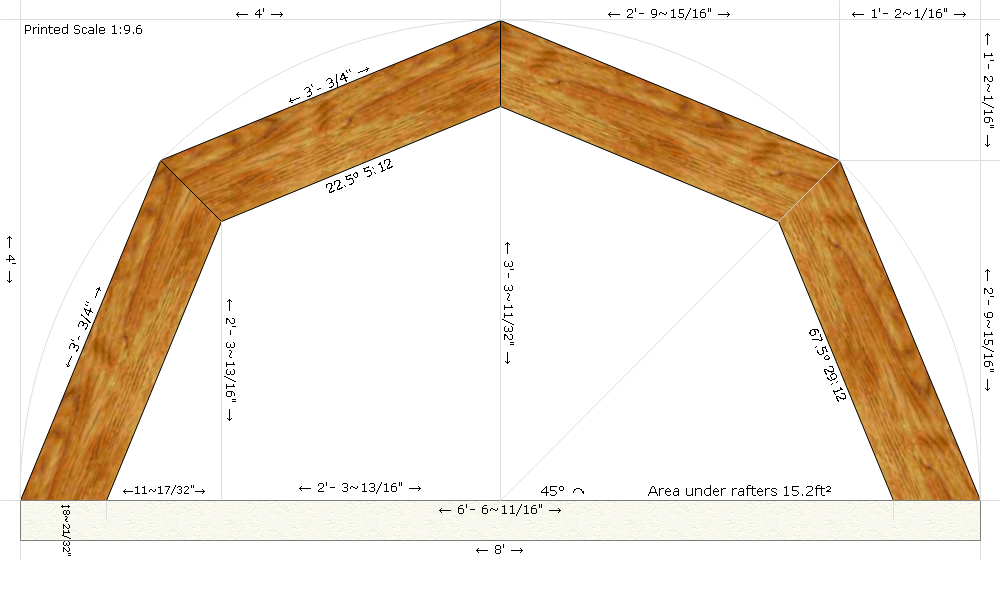
When building the trusses I put in 8 foot 2 x 4 on the ground and aligned the pieces until the span came out to be exactly 8 feet on the outer edges. I then used in air stapler and glue to quickly tack on gusset plates and lock the alignment in. I then used three drywall screws per side to secure it doing each joint in sequence then flipping the truss over and repeating on the other side. Note that the two end trusses only get gussets on the inside edges because the outside will end up she did with the plywood siding. Also you will probably want one extra truss so that you can double one up when nailing on the roofing. Since plywood comes in 4 x 8 sheets and the roofing has to overhang on each end you end up having to splice in more than one length on the roof. This was another reason I used a 1 foot on center dimension for the roof trusses I could use a 16 inch wide length of scrap for the 4 inch overhang and the 12 inch span, then use a 90 inch length of plywood to complete the run for each roof panel. When erecting the trusses you can see that I used spacers nailed in a staggered pattern to get proper alignment and to hold them up securely while I was working. I also used the same length spacer at their base. Cut one or two spacers first to make sure they are the right length I forget the dimension but it was not what I originally thought it was going to be.The staggered pattern is for nailing so the ends of the previous one are always exposed. The overhang sections I actually completed with scrap from another project I did order five sheets of sheathing originally but did not end up having to use the fifth sheet your mileage may vary. So the overall order of operations was to create the base than the sidewalls. Brace the sidewalls to the base, then I put up the trusses. Then the back wall. Next I sheathed the sidewalls which significantly strengthened the structure. To position them into place while I nailed them I used a floor jack. This entire project was done exclusively with one person. I then sheathed the back wall, then framed the front wall. Put up one piece of the front sheathing, attached the hinges, then cut out the door repeating for the second side. Next it was time to put on the roof sheathing. I put the left and right lower sections on first with the top edge cut at a bevel matching the roof angle, leaving an eighth of an inch gap where the upper section would go over it (for expansion of the roofing material) the bottom edge rested directly on the side sheathing for easy alignment and nailing. When I put on the two upper pieces of sheathing I cut the upper bevel on the ground and cut them long so the outside edges would overhang the sides. I then ran the circular saw down the outside edges once nailed in place as an easy way to get the proper length. Making the cut on the shed on a ladder was a bit of a pain and a face full of sawdust, but it's a guaranteed way to get the right length which can be tricky when dealing with beveled cuts. I really didn't feel like risking expensive material that was also quite heavy to carry and get into place. For the side overhangs I created ladders using scraps of 2 x 4 cut at a 60° angle on both ends. I attached them to a plywood backing plate with screws and glue then screwed the backing plate to the siding of the shed the scrap cutoffs from the roof sheathing were a perfect width to cover the span. 
Next came the drip edge than the tar paper and currently I'm finishing up the shingling. I bought a framing nailer for the first shed that I built and it was a godsend. This time around I also bought a roofing nailer which again is worth its weight in gold. Power nailers make the job go so much faster and save so much labor. You can buy them used on Amazon, and probably sell them for what you bought them for when you are done again through Amazon. Totally worth it. A note on the roofing nailer, each bundle of shingles uses one spool of nails. 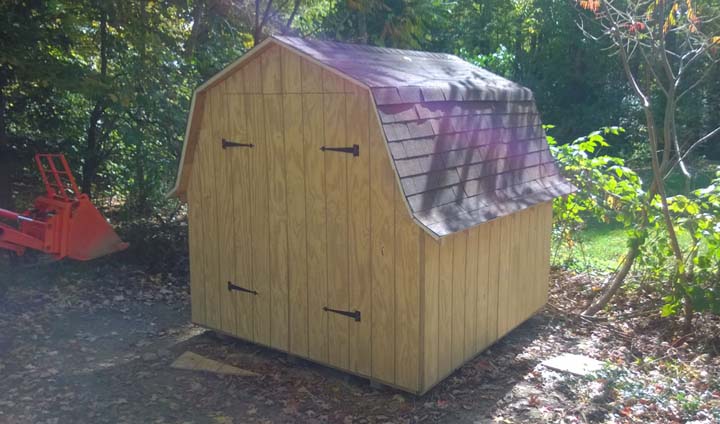
Comments: (0) |
About Me More Blogs Main Site
|
||||||||||||||||||||||||