Quick Attach Bucket


Author: Dave
Date: 09.01.14 - 8:10am


This is a build log for converting a pin on bucket to a quick attach system.

For this build i decided to start with the quick attach brackets and mounting plate from Titan distributors.


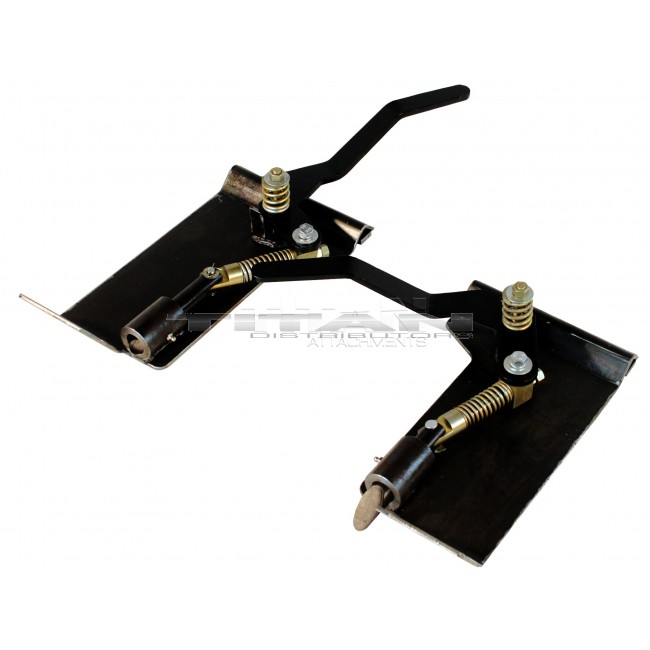
The first thing i did, was create complete cardboard mock ups of the bucket, backing plate, and latch plates so that I could fully visualize the offsets and relations of all the pieces. (because I have a smaller machine, I wanted to make sure it wasnt to big)


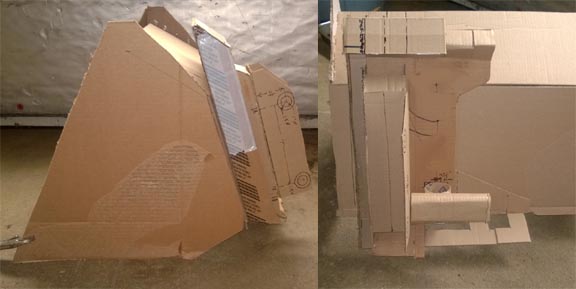
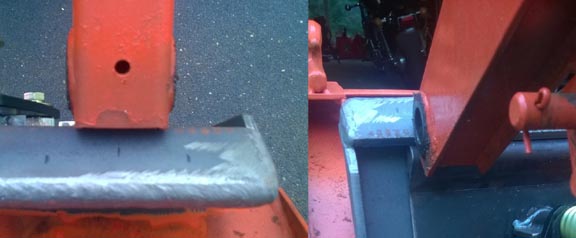
Once i was decided it was a go, it was time to cut the tabs off of the bucket. I took the easy way and used a cutting torch.


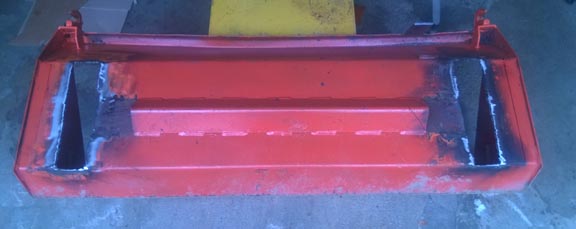
One the tabs are out, they require a lot of cleanup. Personally I felt i really wanted to get all of the old weld off and remove the layer of bucket plate still left on them so I could get a solid weld when i reattached it. You probably dont need to do this, and just lay on an extra wide bead, but I wanted to. I am only doing this once.


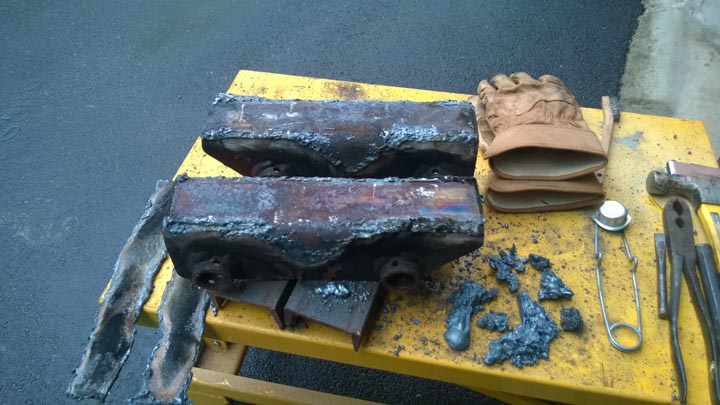
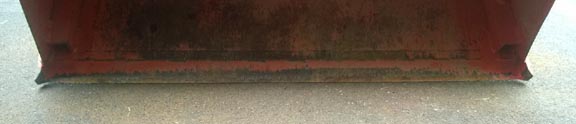
Take note just how much slag is in that picture! Once you get to this point, you then have to use a grinder to clean up any left over weld and smooth them out. One thing I initially forgot to consider is the time required to clean up all the burnt paint and fried grease. From the INSIDE as well as outside of the mount if you want any paint to stick. Outside is easy of course, inside kind of sucks. I gave it an initial wash of acetone, then a fair amount of sandpaper stapled to a stick.

I have been fabricating things for a lot of years, i still underestimated how long it would take to get the tabs free and ready for re-welding. It was at least 4 hours to get them off and everything cleaned up.

Next order of business, is to double check your clearances and figure out exactly how you are going to mount the tabs to the latch plate. I attached the tab to the cardboard mock, and re-mounted on the tractor to look for clearance.


Thats a 3in riser in the picture. Its hot glued together, and to the metal bucket ear. I have both 6ft x 3.25in x 1/4in plate coming, as well as a 3ft section of 3x3 square tubing .25in wall. Each material was about 60bucks from Mcmaster carr, I only need one of the other, but not sure which I am going to use yet. (I like having a good stock pile anyway so dont mind the extra material)

Now we move to aligning the backing plate so its square to the bucket. Actually the meaningful metric is that its top edge is parallel to the cutting blade of the bucket. The best way i figured to make this critical alignment, was to base it off of a crease in the bucket in the back. I am assuming a couple things here, that the plate is cut well, and that my bucket was fabricated to good standards and has not been tweaked through use. Both of these seem like pretty safe assumptions after looking them over closely. Below is how I lined it up on both sides before tacking it in place.


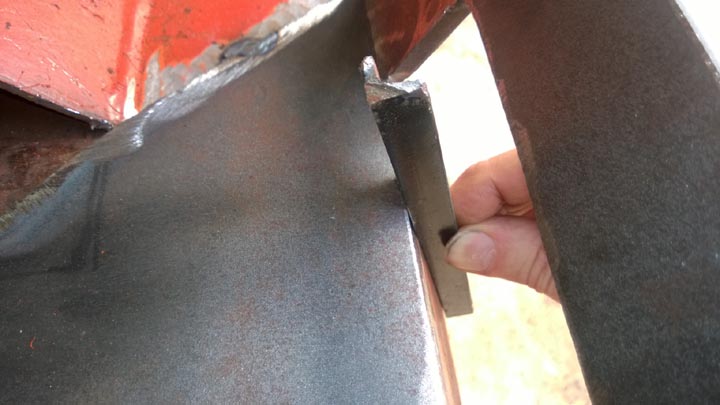
I was going to line up the bend in the backing plate to that fold in the bucket anyway, so a piece of angle iron as a straight edge through the slot provided a very convenient register. Still, I have only welded about 6in total on each side as heavy duty tacks (total weight is over 150lbs) and will do final welding after I am sure it is how I want it, which is after hanging it from the actual quick attach mounts. Base on other post tack measurements, I am feeling really good about the alignment though.

Next it was time to build up the loader arms side. Here was the order of operations I used for alignments on this part.
  • weld the 3in tubing onto quick attach plates as spacers. They are a little bit longer than the bucket ears on purpose to give some adjustment in mounting position up and down. I lined them up square to the edge of the plate, and aligned them vertically with the bottom bend (making sure they were sitting completely flat)
  • pull tractor up to bucket and mark centerline of rams on bucket plate.
  • hold bucket ears up to plate and mark outsides on bucket plate
  • latch the quick attach plates into the bucket plate so outside edge lines up with outside edge of bucket ear mark.


  • make sure the bucket and tractor are sitting level
  • make sure your tires are fully inflated
  • attach the bucket ears to the rams, and position the rams so they were perfectly mated to the quick attach plates. This part kind of sucked since the rams arent tied together at all and can be out of sync with each other. I had to turn off the tractor several times, release the value and use either a rope to pull on them, or stick to push on them to get them perfect. Having two people would have helped a lot here.
  • Once the alignment is right I clamped them in place with small C clamps, and then ran about an inch of weld down from each corner to tack it.
  • next I lifted up the attached bucket and make sure the blade was parallel it came out perfect.


  • I would recommend attaching the cross bar at this point to tie the two sides together. I had to do it at a different time which meant having to repeat the whole annoying step of lining up the two rams position again.
  • when installing the side to side bar, do not base any of your measurements off of the bottom folded edge. I had the bar lined up perfect by eye, then decided to measure to the bottom edges and adjusted it 1/4in to trust the tape..poooop..doesnt matter, but still..poooppp
  • The hole in the gussets are so I can use an engine lift to hold it up for me while I align the pins since i am always working alone. I suppose I could also lower the loader and use the hydraulic lift table, but just thought of that now!
One thing I got wrong was how far I should cut back the angle iron support welded onto the back of the bucket. I kept cutting the minimum off again, and again...and again ! I was being way to fussy for something that doesnt really matter. I must have cut it back 4 times total. My final cut in was 9.5in from the quick attach side on the bottom, and 12 on the top. This gives me about an inch of misalignment when hooking up. The taper will help me center it if off more than that (maybe).


Below is a picture of the finished mounts. There is one more stop I added so it cant open to wide and bind the mechanism (not shown). There is even a flat for it on the lever arm, so they intended it to be there. Here we are finally ready for paint prep!


original weight of bucket:150
new weight of bucket:190
weight of quick attach: 80
total weight now:270
weight added:120


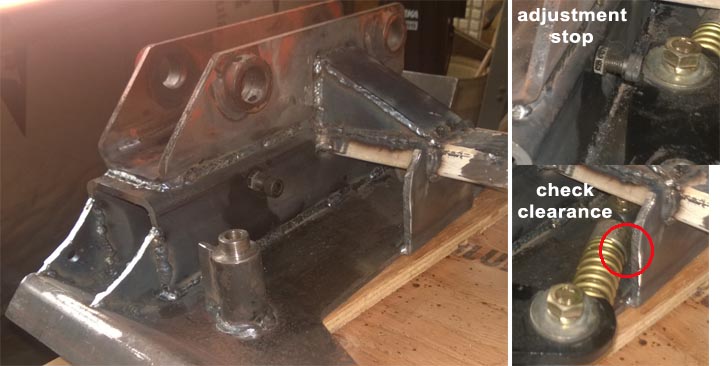
9.13.14 - quick attach side is primed and ready for final paint. All welding is now complete !

One more final picture. At the last minute before paint i decided to add another gusset to brace the overhanging quick attach plate. given its thickness (5/16) I feel pretty safe it didnt need it, but it only cost a second to do it now when I had all the tools out.

Also it gave me a perfect place to drill a couple more holes to use as a bucket lifting point with the engine lift. The bucket actually lifts dead flat from that hole position. Perfect!

After seeing the 3/8in holes there, made me think to enlarge them some more so its another clevis mount point. The holes might be a touch close to the edge now that I enlarged them, but if its ever a problem I can run a little more weld on the top edge to build it up and make it thicker. Should be safe anyway. Thats would be a small job with minimal paint impact, so screw it. Enlarging the holes at a latter date would have sucked.

You can also see how I mounted the chain grab hooks in this shot.
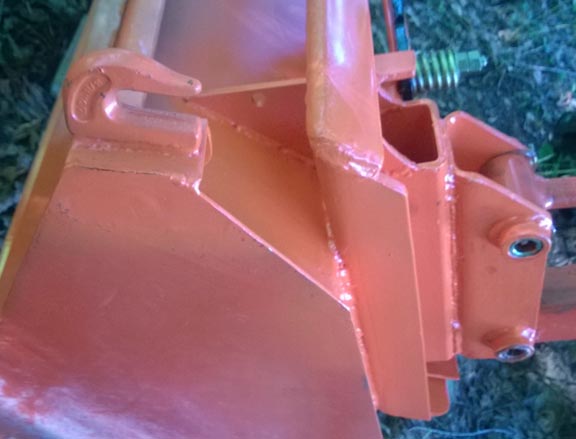


Comments: (8)

On 05.06.15 - 8:06am Rusty wrote:
Dave, Thanks to the info in your video we would like to add the center square tube and the spacer parts to our QTK as an option for future customers. Could you tell us the dimensions of the spacer part circled in the attached photo? http//www.palletforks.com/weld-on-quick-attach-brackets.html Thank you for your help, Rusty Robinson Titan Distributors, Inc.

On 05.06.15 - 12:30pm Dave wrote:
Hi Rusty, I didnt see any circled red part in the pictures on the web page?

The spacer to mount the bucket ears to the latch plate was 3x3 square x .25in wall x 1ft long

the spreader that ties the two latch plate together was 2x1x .125in wall for me on kubota bx7500 it

was 35.5" in long. this will vary per machine and might be a touch light but I had it laying around

On 12.23.15 - 9:12am Jerry wrote:
Nice job. Well documented. Thanks. How wide are your fel arms center to center?

On 12.23.15 - 9:32am Dave wrote:
Hi Jerry, The arms are 39" apart center to center Thanks

On 01.03.16 - 5:03pm Jerry wrote:
Switching the plates and handles worked out. I had to cut into the 3x3 tubes to provide clearance for the handle, pin and springs. It was a bit complicated, But worked. Heres a link to TractorByNet thread I posted. Thanks for your help and your blog.

On 04.15.17 - 7:07am Mark wrote:
Is the size of the cross bar important or is it just there for alignment? I bought the kit from titan with the extra tubes but the cross pipe is a 1/8 higher then the spacer bar . Id rather have everything flush and flatt

On 04.15.17 - 12:22pm Dave wrote:
My read on it is you definitely need a cross bar to keep both sides in sync, otherwise one could get ahead of the other and you cant clamp in the bucket. As far as how strong it has to be, my tubing is 1/8 wall x 1.5deep x 2.5wide I think. I wouldnt go any smaller than that for my tractor and I have a small kubota. When in doubt go heavier tractors get allot of forces on them, also look at the commercial models and see what they used for your size tractor. Also stock steel sizes only come in. Certain increments, dont forget the weld size you can probably fill in and differences with weld or with an 1/8 plate to even it out.THats the best I can figure. Good luck !

On 10.29.17 - 8:26am Tom wrote:
Awesome engineering and fabrication. Thanks for posting this, I plan to take this on in the spring.

 
Leave Comment:
Name:
Email: (not shown)
Message: (Required)
Math Question: 94 + 97 = ? followed by the letter: I 


About Me
More Blogs
Main Site
Posts: (All)
2024 ( 1 )
2023 ( 1 )
2016 ( 1 )
2014 (5)
     Shed Plans
     Plasma Tracer
     Lift table
     Quick Attach Bucket
     Cheap Ramps
2013 (5)
     Beam Trolly
     Keyless Chuck Internals
     Chuck Replacement
     Sieg X2 / X3 Compare
     Stock Carts
2012 (4)
     HF Bandsaw Blade Guide
     Welding Corner Clamp
     Home made adjustable work light
     Aluminum Welder Cart
2011 ( 8 )
2010 ( 2 )