CNC Rotary tableAuthor: Dave Date: 02.21.15 - 6:22am this is a post on how to convert your manual Rotary table into a computer controlled automatic indexing one. This build uses a stepper motor, a prebuilt driver board and an Arduino. The wiring is fairly basic and the source code is freely available. More pictures including a schematic are included in the source repo. There is a video at the bottom of the page that walks through all of the details. all of the electronics for this build cost about $100. all you really need to do is connect premade components. 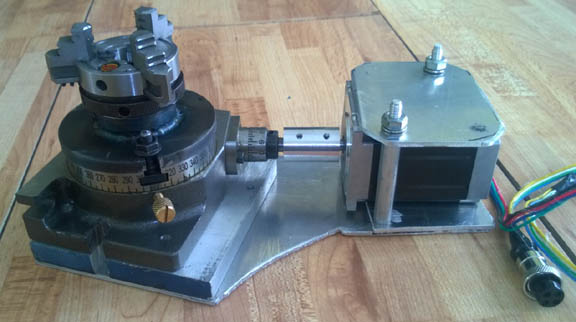
you configure the Rotary table, through a Windows PC and a USB cable. Once it is configured, then you use the forward and back buttons in the hand control to advance the table the specified number of degrees or divisions. Before the table is configured, it will default to jog mode for easy setup. 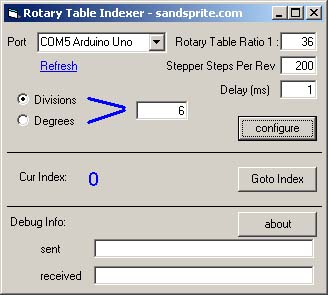
Switches on the electronics case allow you to switch between jog mode and indexing mode, as well as disable the stepper motor so that you can spin the crank by hand. A home button is also included. I didn't spend a whole lot of time on the stepper motor mount or coupling to the Rotary table. It does not have to be fancy to work. The reason the aluminum base plate was necessary, is because otherwise the stepper motor would have hit the milling machine table when the Rotary table was laying flat. all of the electronics are mounted in a plastic case, which was actually scavenged from the back of an old radio. The stepper motor driver board has switches on it, that allow you to configure how much power it draws. These switches must be set with in the available range of the power supply. If the driver board draws too much current you will see the light flashing as it keeps browning out. 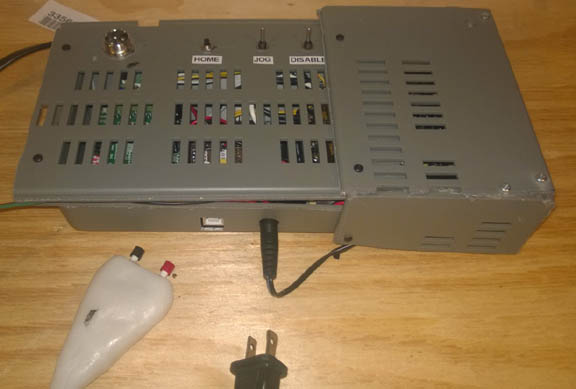
below is the video overview of the entire system: I don't have a video on punching the numbers but I did take a picture of the jig I used, basically I cradle the dial, the piece of wood that I insert locks it into place and also provides a backrest for the punch so that all of the numbers are in the same plane and not twisted. it is still up to the user to increment it just right for the next number, but all of the hard variables are accounted for. I tried punching a couple by hand first and I just could not get it right. This set up allowed you to do okay by hand. If I did it again I would probably also add a guide to keep the punch perfectly vertical. 
Comments: (1)On 03.01.15 - 10:27am Dave wrote:
|
About Me More Blogs Main Site |
|