I googled a bit trying to find plans to make a bellows for campfire nights, but didnt really turn up anything useful. De Re Metallica did have an old drawing which helped.
First a couple picts
So here are my observations.
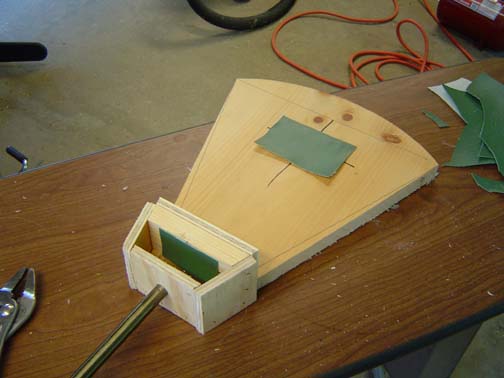
two flappers made of some leather like materal (vinyl in my case)
, one makes sure the flame doesnt get sucked into the air chamber, and another makes sure the air doesnt escape the intake holes when blowing.
use straight sides my first attempt was rounded, and trying to get the material right was a pain in the ass
use a decent thickness base material and of a soft wood, this way its easy to screw into or staple.
in the valve box near the blow pipe, make sure to use a thicker piece there too, the hinge flap needs support and you need to screw into it as well.
you can see how i secured the vinyl to the body, this sandwich technique was very easy to get together and has a great seal. leave overhang you can trim it with a razor after. also note how i wrapped the edges around on the back segment and sandwiched thosed on the flat faces of the top and bottom. very easy again. (I care little for appearance for a camp fire bellows, you can fuss all you want with some other technique)
the extra piece of .25" plywood on the valvebox gave a great place to hot glue the side material to the main body.
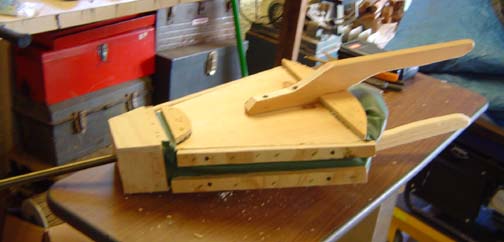
the hinge flap was hot glued to the top of the valve box, and then the top piece air stapled in place with a layer of hot glue as well.
when attaching the side material, first i air stapled it, then i put in two screws per side strip.
used plywood for side strips so it wouldnt split being so thin.
left a little bit extra material on sides and creased it in so that sides would collapse inward when depressed.
material on back side of bellows (where handles are) determines height you can open it.
I lost a little more travel than i initially planned, but the bellows give still give a very long nice blow of air
bellows are a very simple device, even if you have leaks in the corners, they do a good job. its pretty hard to make an unusable set i think
the flapper valves do surprising well too. I left about 1/2 inch of material to seal around the holes and i dont detect any leakage in use.
I drilled the holes with a forsner bit so i would have very clean edges. starting drilling from the side the valve will seat on. just before it breaks through, i flip the piece over and finish the hole from the other side so its ideally clean on both sides.
entire project probably took an hour to an hour and a half.
1 square yard of the vinyl was 8 dollars. I already made two, and could probably make another three.
flappers were just hot glued to the body
no i didnt have to measure a single thing to make this project! just line up pieces, and trace outlines. The beveled pieces inside the valve box were made by attaching longer pieces to the already cut body, and then using the body as a template cutting them on the bandsaw to match the bevel perfectly.
intake flapper is two 1 inch holes, seperated by about an inch. this spacing allowed enough room for the handle to be attached and run down the centerline not disturbing them. a larger hole probably would had a weakness in the material wanting to suck through. it breaths perfectly with holes this size.
the offset handles make a big difference, the first one was didnt have these and you pinched your fingers everytime limiting stroke even more.
one model i had the intake flapper on the underside of the top piece, on the other I had the intake on the topside of the bottom piece. Having gravity keep the flap closed for you is a MUCH better way to go, otherwise you have to pump hard to start to get it to seal. Put the intake flap on the bottom board.
made a third one from the botched first, it was thin plywood body, so I stapled strips of thicker wood inside to use as mounting strips. While it sounded like a good idea, it made sealing the fabric on the air box end harder, and you have to be careful it still closes right (maybe make airbox taller to accomodate. tack strips were flush with outside edge of body with mounting rail offset to the inside. Could be a cleaner design, but was a lot more work.
if you want to get purdy, it should be pretty easy to replace the tack strips with brass plates and ornemental nails from an upholstery store. (Although my heart is still with the fast and efficient air stapler :P
Update: So I have just finished my 4th bellows here are a couple more tips as I experiment with the design.
for the back end of the body pieces, using 3 flat sides like on a stop sign seems easier than a curved arc.
in each case I have had to create a crease in the material and overlap it on one corner like when wrapping a christmast present. I am not good with working material, but it keeps happening despite my best attempts at making it not.
a tight hinge area is the key to no leakage. when i put the top on the air box, i use a piece of vinyl as a gasket the entire way across. also when you attach the hinge piece to the top board, make sure it is the same width and a close fit. the top board should be pressed up against the body of the air box tightly (it only swings away never closer), and the top piece you attach to it to sandwich the hinge onto the top body has to be a board thickness away from the airbox so it doesnt bind when you open it. Also, this time around i hot glued the hinge to the top body piece right at front edge so the hing was real tight and had no slop to it. (the top clamp board is goign to be away from the edge so this helps especially for assembly.
one thing that worked out nice, the bottom board needed to be trimmed 1/4 more on the end to match the top (took to much off the top board when i cut to compensate for the airbox). This left me a nice one piece contour that matched the 3 sided cut on the end. I was able to just staple this one pre-formed piece back into place to secure the cloth and it looks slicker than using three individual straight pieces like i had to do on the top piece.
when i get to attaching the vinyl from the sides to the the airbox its nice to have more surface area to glue to, also i leave an extra flap that i glue up over the hing material in the gap between the top hinge clamp piece and the air box. helps make a tighter seal. This is the hardest place to seal.
The difference between a tight seal and leaks, is how long and slow you can pump it to produce a long continious flow of air. This last one is a very good seal, and it gives a very long slow pump with good pressure. So much so that kids playing with it would probably create to much pressure and pop a glue joint somewhere..
if you really have to, you can patch a couple layers of vinyl together with a decent overlap and lots of hot glue. the bond is pretty good so I suspect it will be permanent. (I used to cuff my pants with hot glue and it held for years and years of washings)
Two more surprising ones:
Its actually pretty easy to make the valve flaps to big. If the flap is to big relative to the size of the hole, it will not breathe properly and it will be laborous to intake and blow. 1/4in overlap from the edge of the hole seems to be enough. Having the glue joint to close to the top of the hole may also be another error that makes the draw to stiff.
dont make the bellows open TO far. more air sounds like a win win, but its not, because if you open past a certain angle a fair portion of the slack in the material will lead to lost stroke as it balloons out during exhaust stroke.
even after 4 of these things I have yet to come up with the ideal proportions. There are a lot of design considerations that go into making a nicely tuned bellows ! Turns out making a bellows is a more interesting project than one would have expected.
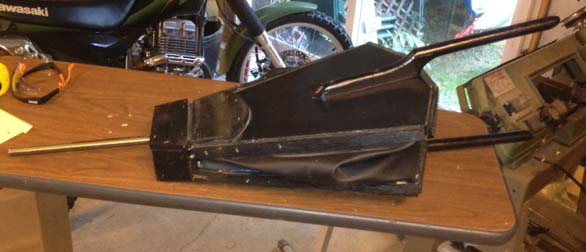
Updated notes after the 5th pair:
this time i used a metal hing inset into the top body to pivot on. Much more controlled than just using the vinyl as the hinge. probably longer life too.
i left the upper body about 3/4 of an inch longer than the bottom piece this time. I had almost no crease in teh vinyl now as the ends lined up much better than before when the bellows is in its open position (where you attach the material)
for the joint between the body and airbox, I used 3 layers. one a gasket over the airbox to the box like the hing plate i used before. also i left the side pieces a little longer and wrapped those over the hinge plate a ways. then i hot glued on a final layer over it all to wrap the front airbox in vinyl for appearance (i used luan as top plates) this is the best seal accomplished to date and most finished appearance
I was almost going to wrap the side rails in a layer of vinyl too for appearance to hide the staples and plywood strips used to sandwich the bellows vinyl to the body, but I got lazy and the black paint hid it pretty well anyway.