Trash Can WheelsAuthor: Dave Date: 05.03.14 - 2:00pm I had a large trash can with wheels. Great addition to the traditional design, however I was cheap when i bought it and went for the model with the small 6in diameter wheels I was always annoyed by the small wheels. Even when empty, it could take to tipping back and forth until it finally fell over out of your control. The wheel base was to narrow, and the tires to small to control its height. Also the small tires were of no use in the snow and you just ended up dragging it. So...I was finally tired of it, and...I had an old junk mountain bike laying around. Today I raided my junk pile and upgraded the trash can in what I guess I would call a trash can dolly? trash can cart?, trash can with large wheels? (hows that for keyword spamming?) 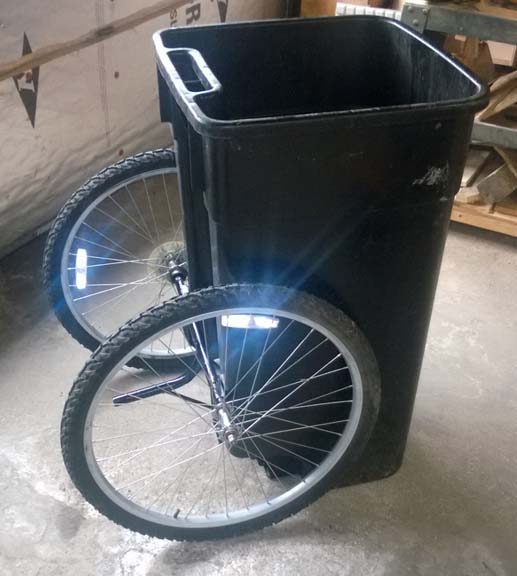 Basically I took a piece of tubing and welded the a nut for the wheel into each end. Alignment here is a bit tricky, you will need to put the nut on the wheel spindle and use the entire wheel to help you with the alignment. If you end up off kilter, really its just a trash can it doesnt matter and is good practice. (Dont worry, the older you get, the better you get at free hand precision alignments of welded parts) If the tube is to large, you can crush it to the width of the nut. Weld the two accessible sides, slice the bulging sides, hammer them down and weld up tight. Then I welded a piece of sheet metal onto the tube to be a backing plate. The backing plate got riveted to the body of the trash can 3 per side. Another piece of the same sheet metal is on the inside of the can to help distribute the pressure across a large surface area. It also worked out really nice than the trash can had those deep channels on either side where it is riveted. This keeps the backs of the rivets in the channel so they wont have a tendency to tear the bags. I left the original axle rod in place and removed the tires. It is the strongest structure of the trash can so I figured i would still try to utilize it. I welded some rod up from the original axle, to the bottom of the plate, where I changed angles and tied it to the new axle tube. 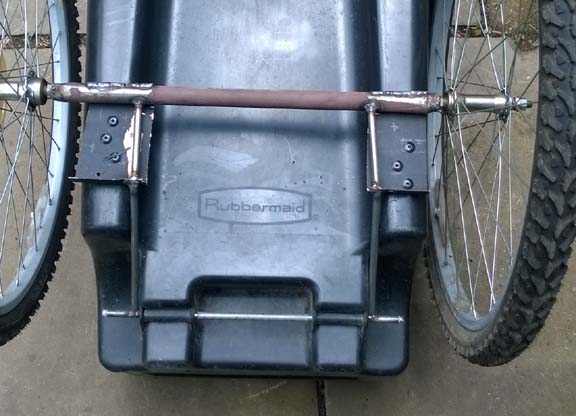 
The center tube you see sticking out to the back, is a foot lever so you can easily tilt the can. It really needed this since the tires are so large, but now its very smooth. This again is braced to the old axle with a piece of rod. Tires from an old kids bike would have been perfect I think. This ones look a little comical, but will be great for the snow. A down side to using large wheels is that the most comfortable place to wheel it, turns out to be a near horizontal position. This is where its most balanced and not trying to pull on you at all. The more weight near the top of the can as it fills will also change the balance more in the users favor. A lower pivot point would be less weight trying to pull it out of your hand and more weight leaning it into you. Also the large diameter tires can nip you in the heal as you walk. For a scrap pile project though I cant complain. Now I am trusting the trashmen not to throw it around and break it. I might also fill the tires with foam so I never have to worry about them loosing air. This design (with smaller tires) would really be great for old people. Update 11/27/15: Well my old trash can lid finally broke apart completely. It was a bad cast but was the only one left when i bought it. I ended up making a replacement out of some 3/8" plywood covered in a self adhesive rubber+tar roof underlayment called stormguard. 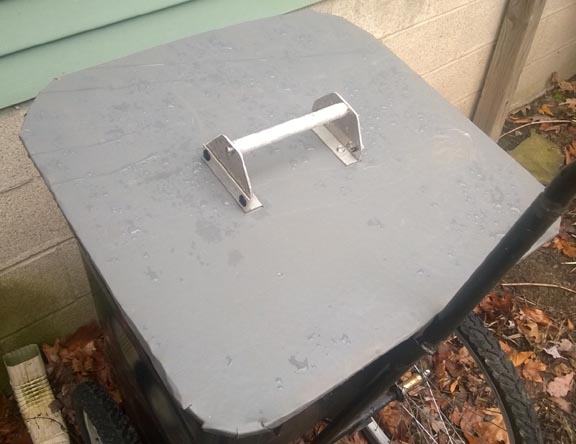
The handle is all aluminum. 2 pieces of angle screwed to the lid. 2 pieces of 1/8 plate rivited to the angle. and some 1/2" rod drilled and tapped on the ends to accept a screw to hold it all together. To keep the lid from sliding off, I added a second piece of osb below it that sits inside the rim of the can so it cant go anywhere. This also gives me more meat to screw the handle into and more support for the top lid against snow load. 
Since the wheel mechanism is so heavy duty, it easily supports me putting extra heavy bags on the lid and just rolling the whole deal out to the curb at once without having to lug heavy bags which didnt fit inside of it. Couple years on now and this contraption is a proven winner. First neighbors laughed, but now they are envious. Comments: (0) |
About Me More Blogs Main Site
|
||||||||||||||||||||||||||||