Securing Business Apps
Rise of the White Collar Crackers
Rise of the White Collar Crackers
Section 3 - Hacking the UI & Privilege Escalation
- Enabling Disabled Menu Items
- Enabling Disabled Form Elements
- Showing Invisible Form Elements
- Revealing Hidden Features by Resizing Forms
Now we can look around some. If we used the null char injection technique then we have access as the first user in the database, in this case the low data entry level.
If we used the binary patching technique, then are stuck with whatever the default level access is...again mere data entry level.
Another situation just as likely is that the user is actually a legitimate user to the system, who wants to get in and cause some problems.
Now our focus turns to privilege escalation.
Looking around, we see that we do not have access to the accounting and administration functions. Data Entry personal can only take orders and look up customer balance information.
The top menus that hold Administrator and Account links are disabled, and there are no disabled options on any of the forms we have access to that look to interesting. So where do we go from here?
Lets say our first interest is in getting to those administration functions that are shown as disabled on the top menu there. Can we enable those menu items ourselves or otherwise execute the functions they would call?
Would I have mentioned it otherwise? :)
Enabling Disabled Menu Items
First, lets start with the windows API. The API (Application Programming Interface) is a set of standard functions that developers use to call routines that the operating system exposes. These standard services include things like writing files, messaging services and yes...even menu creation/manipulation functions.
For API chaos and hacking I have thrown together a little program called winHack. (also available in the zip download at the beginning of this article)

The fourth button over from the left is the menu analyzer, and will break down a forms menus by handle, id and index and allow you to play around with API calls to them. Here is a picture of the form below with the settings entered to enable the Product Administration Menu item.
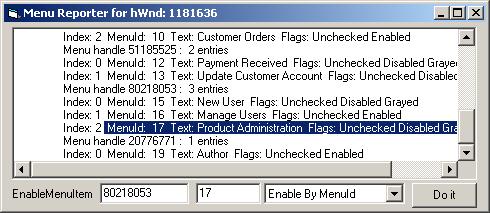
Hitting DoIt will call the EnableMenuItem API and magically turn on the menu item so we can select it.
Sounds pretty easy huh?
Well it comes with a catch. While it does indeed enable the menu item, for Visual Basic apps at least, this is not enough for VB to fire up the event handler for the menu item :(
Why do I mention it? Because it will probably work in just about any other programming language. I dug a little more into it, and the menu does send the exact same messages to the main window handler as for an enabled menu item, so the menu is working as it should, however it appears as if VB is not listening for that message to hook to the proper event handler when it believes the menu item is disabled. Go figure.
Anyway...we want those menu items. Our first stab hit some bad luck, time for take 2.
If you look at the over all layout of a VB compiled app you notice some things right off the bat. VB has its forms names, objects, and their properties all stored within it in a series of object tables. If we can learn to read and identify these objects then maybe we can manipulate their properties so they will be enabled by default.
Scanning down through the exe we come to some strings that look like the menu captions we see in the application. We also note that preceding each caption in the app is a mnu* string. This is a common notation by VB developers to name their menu objects.
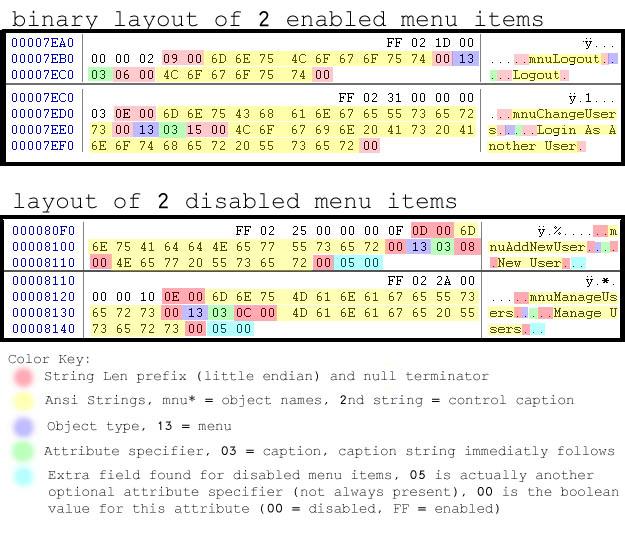
In the image above, we have compared two sequential enabled menu items we found in the main app. Below that, we have two sequential disabled menus.
By comparing the two we are able to draw some similarities and try to define some common fields. Highlighted in red are the string length prefixes and null terminators. Yellow are the object and caption strings for each object. The objects themselves seem to be delimited by the FF 02 markers left in white.
This leaves us with just a couple fields we need to look into. The 13 03 looks curious but since it is found in both we know it does not have anything to do with the menus disabled/enabled state. Upon some further research we find that 13 is the object type identifier signifying a menu item [1] . Ok that makes sense. Looking some more we are also able to find documentation that the 03 is a property specifier, in this case for the caption property (for which the caption immediately follows).
The differences between the two, is the presence of the trailing 05 00. Looking at the documentation...we are able to see that 05 is an optional attribute specifier for the enabled option. 00 is the value of its state (false). Hummm..Can we change its default state from disabled to enabled?
Lets change that 00 to FF.
Starting up the app again, guess what...the menu item is now enabled by default and fully functional. It appears the author did not perform any further checks on the administration forms. His assumption was that only administrators could make it to this form and thus there was no need to performs further checks.
Want to try this one for yourself? Fire up the Patch Manager and enable the menu item checkbox and start up the app again. Pretty slick. Ok, so this is handy to know, but it only works because the author relied on its default state being disabled and had not set it latter in code.
Had the author left it enabled by default and then disabled it based on user credentials then you would then again have to dive back into the debugger to manipulate that logic. Can you find where the menus are manipulated based on the login user group?
Hint: The most logical place to put this code is in the form_load event when the main form loads. We know right where this is because we had to jump to the code that loads it back when we were patching the login. Also, we know where the group data was being access to load up a probably global usergroup identifier. If you could find the address of this variable, you could also just manually load it with something and let the rest go its merry way.
So here we are with full access to all of the menu items and their functionality. That wasnt really that hard was it?
With access to the user administration functions, we can now see the administrator login information and login as him.
Enabling Disabled Form Elements
Looking around with the administrator account we notice that some of the forms we had access to as a data entry person, now have more features available to us. Lets compare one such form, the Customer Balance form.
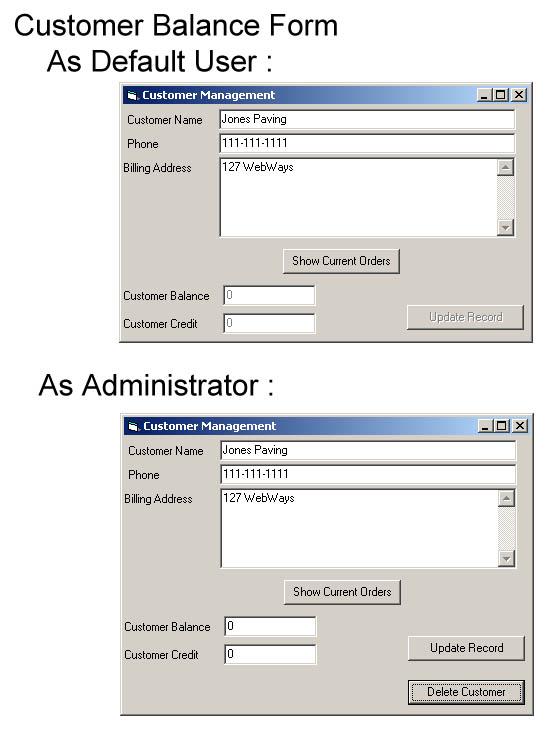
As our default user, we were able to see the account information and account balance, however the "Update Record" button was disabled. Had we logged in as someone from accounting, the update record button would be available to us, however not even that is everything.
As we can see from the administrator user screen shot, administrators also have the option to remove customer records from the database.
Lets go back to assuming we were just a legitimate data entry user. The button is disabled. how can we get access to that functionality?
Lets fire up winHack again and see what else we can do with these windows API tricks. If we could enable menu items...Maybe we can enable command buttons as well.
So we fire up winHack and drag the cross hairs over the Customer Balance form. We can now see some information on the form such as its window handle, its parent etc. What we are interested in here is see what child windows it has. To Windows® every control you see is actually a separate window. Every button, every textbox is actually its own object that the operating system keeps track of.
This time..lets use the 3rd button over which has the tooltip "Enumerate Children"
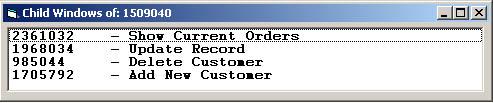
There is our Update Record button handle as well as that of the hidden "Delete Customer" button. First, lets try to enable that Update Record button and see if we cant change our customers billing information.
Select the Update Record entry in the list then right click. If you could see the main winHack window while you did this..you noticed that the window handle was just changed to that of the selected child window.
Why not just use the cross hairs on the button directly? Unfortunately disabled child windows do not seem to give up their handles to the crosshairs method I employ. Anyway we have its handle now, so how do we enable it?
If you have played with the winHack interface much, you may have noticed the tool tip on the first and second buttons at the top. "Enable Window" and "Disable Window" Yup now that you have the window you want in your crosshairs hit the first buttons and watch it enable.
Lets see if it works, change some data up in the address textboxes and hit update record. If you listen, you can probably hear your hard drive churn as stuff happens. If not, reload the form and see if the new data is there. Sure enough it is.
Showing Invisible Form Elements
So what is left to do on this form? From our child enumeration list, we saw a reference to a button named "Add New Customer" I wonder what that’s all about. Do the right click thing to load it as the current hwnd and lets explore another winhack dialog.
The sendmessage form shown below is a wrapper for some common window messaging and visibility functions.

In the top frame labeled ShowWindow lets choose SW_SHOW from the drop down and hit the show button. Hey look, there it is.
Ok, there was one last button left on the Customer Balance form, the delete user button that was only visible for administrators. Can I gain access to that?
Right now the winHack hwnd is aimed at the freshly visible button. For our next manipulation we want it aimed back at the parent form. Sure we could just drag the cross hairs over the main form again, but I dunno, how about something new.
Click on the hwnd textbox in the parent details section of the winHack form and drag it up to the top textbox. The current hwnd is now focused on the parent.
Revealing Hidden Features by Resizing Forms
Now we know there is another button there...but we don’t know where it is. If you were to just try to make it visible, it wouldn’t help...the button must be outside the visible viewing area of the form.
The creator must be dynamically modifying the form size to hide/show options available to certain user groups. Ok, So we need to resize the form somehow. Can this be done?
Sure, go back to the sendmessage dialog and look at the bottom most pane with the MoveWindow button. Fill out the settings as you see in the picture below and hit the button.
Note: The customer balance form was meant to be non-resizable but I forgot to set that option when I compiled the app. At this point it is to late to recompile because it would change all of my offsets in my screenshots. So just pretend you cannot resize the window through normal means.

|
|
|